
Markdownと画像ファイルを同じディレクトリで管理したい
以下のようなディレクトリ構造にしたい。
.
├── _posts/
│   ├── dynamic-routing/
│   │   └── index.md
│   │   └── image1.png
│   │   └── image2.png
│   ├── hello-world/
│   │   └── index.md
│   │   └── image1.png
│   │   └── image2.png
理由としては、記事を書いているときに画像を確認できること。
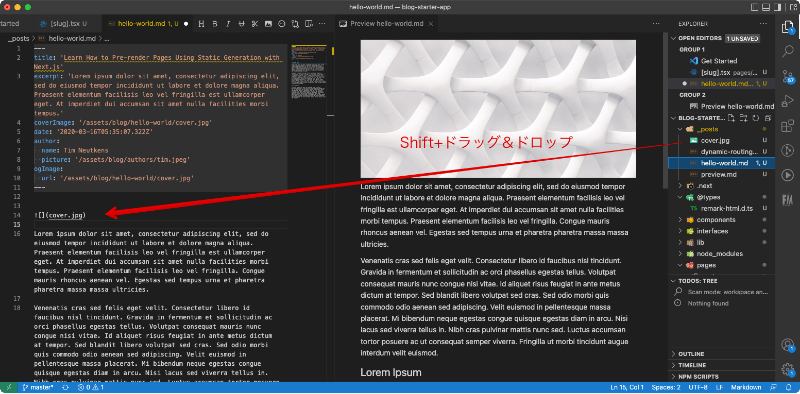
さらにVSCodeなら、画像をshiftを押しながらドラッグ&ドロップするとmdに挿入することができるので執筆がラクになる。
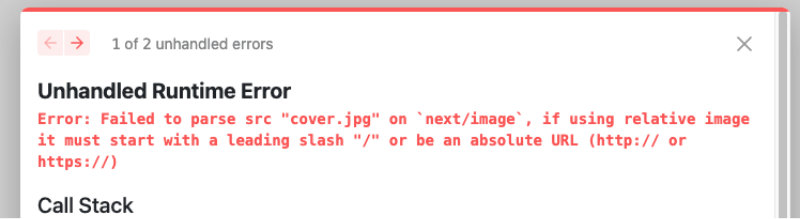
デフォルトのpublicからの参照だと、画像が表示されない

作業
実現するためにやることとしては、
- Markdown→ReactElementに変換
- 変換する際に画像部分は@next/imageを使うようにする
- 画像読み込みのためのWebpackの処理を修正
プロジェクト作成
公式のサンプルであるブログスターターを例に進める
https://github.com/vercel/next.js/tree/canary/examples/blog-starter
このサンプルはMarkdownでの記事の管理が行える
プロジェクトの作成
$ npx create-next-app --example blog-starter blog-starter-app
$ cd blog-starter-app
$ yarn dev
http://localhost:3000/posts/hello-world

Markdown→Reactに変換する
現状、./lib/markdownToHtml.tsでremark-htmlというモジュールを使って、Markdown → HTMLにしている。
post-body.tsxでdangerouslySetInnerHTMLを使って出力している。
<div
  className={markdownStyles['markdown']}
  dangerouslySetInnerHTML={{ __html: content }}
/>
しかし、HTMLのままでは@next/imageのImageコンポーネントが使用できないのでReactに変換する必要がある。
Reactに変換するために、Markdown → MDAST → HAST → React といった手順を踏む。
そのために必要なモジュールは、
- unified
- テキストを変換するインターフェイス。remarkもこれで動いている
- remark-parse
- MDASTというmarkdownを構造木に変換する。
- remark-rehype
- MDASTをHASTに変換する。HASTはHTMLを構造木で表現したもの
- reype-react
- HASTをRectに変換する
(remark-reactというMarkdownをReactに変換するモジュールの方が簡単にReactに変換できるが、廃止予定なので使わない方が良い)
コードを修正していく。
パッケージのインストール
$ yarn add unified remark-parse remark-rehype rehype-react
markdownToHtml.tsを修正。ファイル名はmarkdownToReact.tsに変更。
-import { remark } from 'remark'
-import html from 'remark-html'
+import { createElement, Fragment } from 'react'
+import rehypeReact from 'rehype-react'
+import remarkParse from 'remark-parse'
+import remarkRehype from 'remark-rehype'
+import { unified } from 'unified'

 export default async function markdownToReact(markdown: string) {
-  const result = await remark().use(html).process(markdown)
-  return result.toString()
+  const result = (await unified()
+    .use(remarkParse)
+    .use(remarkRehype)
+    .use(rehypeReact, { createElement, Fragment })
+    .process(markdown)).result
+  return result
 }
出力部分であるpost-body.tsxを修正
const PostBody = ({ content }: Props) => {
   return (
     <div className="max-w-2xl mx-auto">
       <div
         className={markdownStyles['markdown']}
-        dangerouslySetInnerHTML={{ __html: content }}
-      />
+      >
+      {content}
			 </div>
     </div>
   )
 }
しかし、このまま実行してもエラーがでる
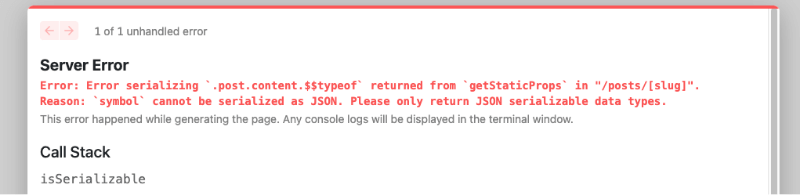
getStaticPropsの戻り値はJSON.parseできる型でないといけない。contentがReactElementになっているのでエラーが発生した。
getStaicProps内のconetentはMarkdownの文字列を渡して、post-body.tsxでReactに変換するように変更。
[slug].tsx
-import markdownToHtml from '../../lib/markdownToHtml'

...

     'coverImage',
     'ogImage',
     'coverImage',
   ])
-  const content = await markdownToHtml(post.content || '')

   return {
     props: {
-      post: {
-        ...post,
-        content,
-      },
+      post,
     },
   }
 }
post-body.tsx
+import { Fragment, useEffect, useState } from 'react'
+import markdownToReact from '../lib/markdownToReact'

...

const PostBody = ({ content }: Props) => {
+  const [component, setComponent] = useState(<Fragment />)
+  useEffect(() => {
+    (async () => {
+      const contentComponent = await markdownToReact(content)
+      setComponent(contentComponent)
+    })()
+    return () => {}
+  }, [content])
   return (
     <div className="max-w-2xl mx-auto">
       <div
         className={markdownStyles['markdown']}
-        dangerouslySetInnerHTML={{ __html: content }}
-      />
+      >{component}</div>
     </div>
   )
 }
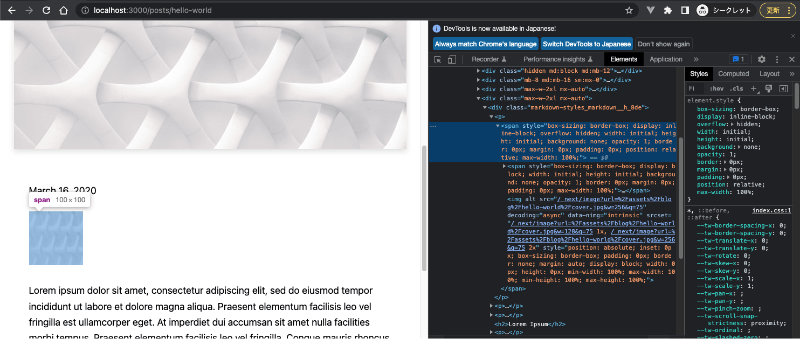
yarn dev すると無事Markdownの内容がReactElementで表示できた。

@next/imageで画像が表示されるようにする
rehype-reactのオプションcomponentsでimgコンポーネントをカスタマイズする
markdownToReact.ts
+import PostImage from '../components/post-image'

...

 export default async function markdownToReact(markdown: string) {
   const result = (await unified()
     .use(remarkParse)
     .use(remarkRehype)
-    .use(rehypeReact, { createElement, Fragment })
+    .use(rehypeReact, {
+      createElement,
+      Fragment,
+      components: {
+        img: PostImage
+      }
+    })
     .process(markdown)).result
./components/post-image.tsx
import Image from 'next/image'
import React from 'react'

const PostImage: React.FC<JSX.IntrinsicElements['img']> = ({
  src,
  alt,
  title,
}) => {
  return <Image
    src={src}
    alt={alt}
    title={title}
    height={100}
    width={100}
  />
}
export default PostImage
publicディレクトリの画像を正しく表示するのが目的ではないので、height/widthは適当に入れておく。
Markdownにpublicの画像を試しに追加する。

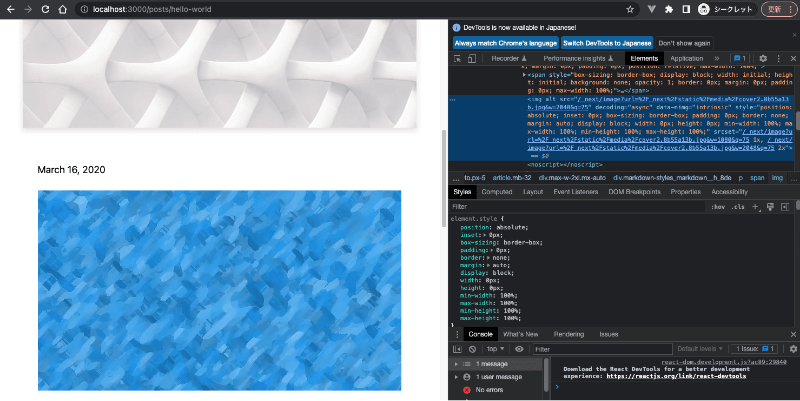
無事、@next/imageでMarkdown内の画像を表示できた。
画像をrequireを使って参照する
最終段階ですが、ここが手こずりました。。
まずは、ディレクトリ構造を記事の最初に示したように、Markdownと画像を同じ階層におけるように修正していく。
.
├── _posts/
│   ├── dynamic-routing/
│   │   └── index.md
│   │   └── image1.png
│   │   └── image2.png
│   ├── hello-world/
│   │   └── index.md
│   │   └── image1.png
│   │   └── image2.png
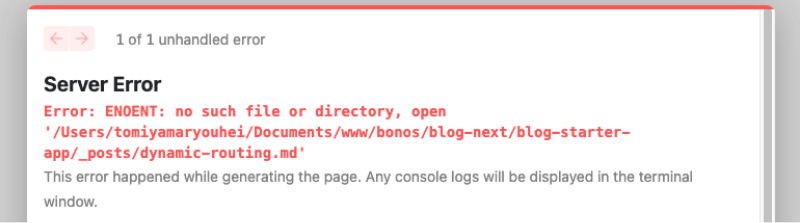
./_posts/hello-world.mdを./_posts/hello-world/index.mdに変更する。
他のmdファイルも同様に変更しておく。
Markdownのパスが変わったので、当然エラーが発生する。
読み込めるように修正する。
./lib/api/ts
export function getPostBySlug(slug: string, fields: string[] = []) {
-  const realSlug = slug.replace(/\.md$/, '')
-  const fullPath = join(postsDirectory, `${realSlug}.md`)
+  const fullPath = join(postsDirectory, `${slug}/index.md`)
   const fileContents = fs.readFileSync(fullPath, 'utf8')
   const { data, content } = matter(fileContents)

@@ -23,7 +22,7 @@ export function getPostBySlug(slug: string, fields: string[] = []) {
   // Ensure only the minimal needed data is exposed
   fields.forEach((field) => {
     if (field === 'slug') {
-      items[field] = realSlug
+      items[field] = slug
     }
     if (field === 'content') {
       items[field] = content
これでエラーは出ずに表示されるようになった。
次に以下の画像[cover2.jpg]を用意して、./_posts/hello-world/に配置

先程は、publicから画像を読み込んでいたが、同階層から読み込むようにMarkdownを変更する。
-
+
このままでは、publicの画像ではないのでrequireして画像を取得するように修正
一旦画像をrequireして表示できるかをテストしてみる
post-image.tsx
  const image = require('../_posts/hello-world/cover2.jpg').default

  return <Image
    src={image}
    alt={alt}
    title={title}
  />
これだと上手くいくのですが、hello-worldとcover2.jpgを変数に変更してみると・・・
  const slug = 'hello-world'
  const imagePath = 'cover2.jpg'
  const image = require(`../_posts/${slug}/${imagePath}`).default
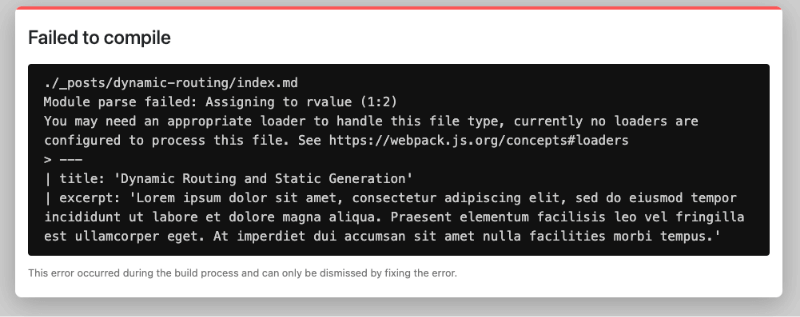
Markdownのloaderがないよと怒られる・・
これは推測なのだが、requireする際に../_posts/以下が代入されるまで不明だから、../posts/内のファイルを参照できるように保持しているのかなと。
その際にwebpackが.mdファイルを読み込むloaderが設定されていないためにエラーが起こるのではと考えました。
webpackにmdファイルを読み込むloaderを追加する
./next.config.js:まだない人は作成してください。
/** @type {import('next').NextConfig} */
module.exports = {
  module: 'es5',
  reactStrictMode: true,
  webpack: ( config ) => {
    config.module.rules.push({
      test: /\.(md|markdown)$/,
      type: 'asset/source',
    })

    return config
  },
}
これで再度yarn devをすれば表示されます。
next.config.jsを修正した場合は再実行しないと変更が反映されないので注意。
画像をrequireして表示できることができたので、slugとimagePathを受け取るように修正していく。
post-image.tsx
+type PostImageFunc = (slug: string) => React.FC<JSX.IntrinsicElements['
img']>
+
+const PostImage: PostImageFunc = (slug) => ({
src,
alt,
title,
}) => {
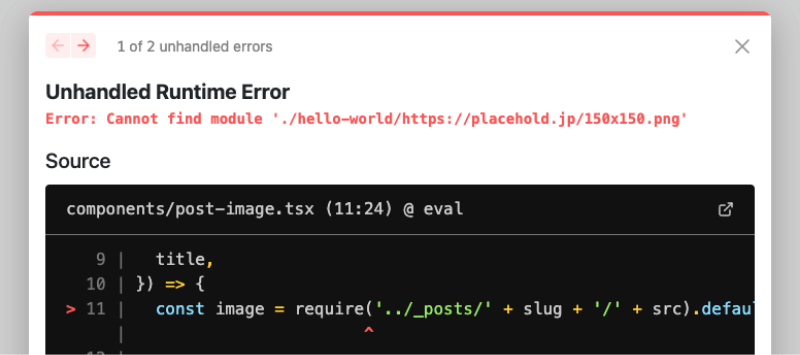
+ const image = require('../_posts/' + slug + '/' + src).default
+
return <Image
- src={src}
+ src={image}
alt={alt}
title={title}
- height={100}
- width={100}
/>
}
export default PostImage
slugを渡せるように各ファイルを修正
./pages/posts/[slug].tsx
                 author={post.author}
               />
-              <PostBody content={post.content} />
+              <PostBody content={post.content} slug={post.slug} />
             </article>
./components/post-body.tsx
 type Props = {
   content: string
+  slug: string
 }

-const PostBody = ({ content }: Props) => {
+const PostBody = ({ content, slug }: Props) => {
   const [component, setComponent] = useState(<Fragment />)
   useEffect(() => {
     (async () => {
-      const contentComponent = await markdownToReact(content)
+      const contentComponent = await markdownToReact(content, slug)
       setComponent(contentComponent)
     })()
     return () => {}
./lib/markdownToReact.ts
       components: {
-        img: PostImage
+        img: PostImage(slug)
       }
これで画像を同階層から@next/imageを使って表示することができました。
ちょっと手直し
このままだと、URLで画像を参照した、publicディレクトリからの取得ができなくなってしまう。


ので、それに対する対応を付け加える。
post-image.tsx
 import Image from 'next/image'
-import React from 'react'
+import React, { createElement } from 'react'

 type PostImageFunc = (slug: string) => React.FC<JSX.IntrinsicElements['img']>

-const PostImage: PostImageFunc = (slug) => ({
-  src,
-  alt,
-  title,
-}) => {
-  const image = require('../_posts/' + slug + '/' + src).default
+const PostImage: PostImageFunc = (slug) => (props) => {
+  try {
+    const { src, alt, title } = props
+    const image = require('../_posts/' + slug + '/' + src).default
+
+    return <Image
+      src={image}
+      alt={alt}
+      title={title}
+    />

-  return <Image
-    src={image}
-    alt={alt}
-    title={title}
-  />
+  } catch (e) {
+    return createElement('img', props)
+  }
 }
 export default PostImage
requireして表示する方でエラーが発生したら、通常のimgタグを使った表示にするようにした。
これで外部URL等の画像も表示できる。
まとめ
かなーり長くなってしまったが、やったことはMarkdownをReactに変換して、その際にImageは@next/imageを使うということ。
今回作ったものはGitHubに置いているので覗いてみてください。
https://github.com/RyoheiTomiyama/nextjs-blog-starter-image-path.git